Reading a Tool Like a Detective: Marks, Form, and Age
The short answer: tool identification works through three reads — form and function (the shape tells you what it does), maker’s marks and patent dates (who made it and when, at the earliest), and construction details (materials and manufacturing methods that narrow the era). This guide covers each method in depth, from chicken-scratch stamps to vanished trades.
Introduction: Why Tool Identification Matters
You’re sorting through your grandfather’s old workshop and stumble on a peculiar metal contraption with wooden handles and strange adjustments. Is it valuable? Is it dangerous? What on earth was it used for? I’ve been there more times than I can count, and that moment of curiosity is where every collector’s story starts.
The ability to identify tools isn’t just about satisfying curiosity (though that’s definitely part of the fun). It’s about preserving family history, ensuring you’re using tools safely, and yes—sometimes discovering that what you thought was junk is actually worth hundreds or even thousands of dollars. I once helped a neighbor identify an unmarked hand plane that turned out to be a rare 1870s Stanley prototype worth over $2,000. They’d been using it as a doorstop.
Tool identification is part detective work, part history lesson, and part treasure hunt. Whether you’re a weekend warrior clearing out an estate sale, a collector building expertise, or just someone who inherited a mysterious toolbox, this guide will give you the systematic approach I’ve developed over decades of tool sleuthing.
Here’s what we’re going to cover: reading those cryptic maker’s marks that look like chicken scratches, understanding why tools from different eras look so different, spotting quality (or lack thereof) in seconds, and most importantly—developing that “sixth sense” that experienced collectors have when they pick up an unknown tool.
Why Tool Identification Gets Tricky (And Why That Makes It Fun)
Old tools weren’t made with collectors in mind. Nobody in 1890 thought, “Better stamp this clearly so someone 135 years from now knows what it is.” Unlike today’s tools with branding and model numbers plastered everywhere, historical tools present some genuinely interesting challenges:
Manufacturing Evolution: Before factories, your local blacksmith made tools by hand. This means two “identical” tools from the same region might look completely different. Then the Industrial Revolution hit, and suddenly you had mass production—but without the standardization we take for granted today. The result? Tons of vintage pieces with zero documentation about who made them or when.
Regional Quirks: This one trips people up constantly. A woodworking plane made in Sheffield, England might serve the exact same purpose as one made in Connecticut, but they’ll look like they’re from different planets. European tools tend to be more compact and refined, while American tools from the same era are often bulkier and more robust. Neither is better—just different philosophies.
The “What On Earth?” Factor: Many historical tools were built for trades that simply don’t exist anymore. Ever seen a cooper’s croze? A wheelwright’s spoke shave? A cobbler’s peg float? These specialized implements can stump even experienced collectors because the trade itself has vanished from living memory.
Wear, Tear, and Creative Modifications: Here’s what makes identification really interesting—people actually used these tools, hard. Decades of wear can obliterate maker’s marks. And craftspeople weren’t shy about modifying tools to suit their specific needs. I’ve seen planes with custom-ground blades, saws with modified handles, and chisels reshaped for specialized work. These modifications, while fascinating, can hide the original identity completely.
Pro Tip: The wear patterns themselves are actually clues. Heavy wear in specific spots tells you how the tool was used, which can help narrow down its purpose even when other identifying features are gone.
Visual Identification: Reading Form and Function
Tools are designed with purpose, and their form reveals function. Start with careful visual examination.
Overall Form Factor: What the Shape Tells You
Before you even touch the tool, just look at it. Really look at it. The shape alone can tell you volumes if you know what questions to ask:
Size and weight: Can you use it one-handed, or does it need two hands? Heavy, robust tools were built for grunt work—think framing, demolition, or working with hard materials. Lighter, more delicate tools? Those were for precision work where finesse mattered more than brute force.
Symmetry is your friend: Here’s a quick rule that works surprisingly often—if a tool is perfectly symmetrical, it was probably designed for general use. Asymmetrical designs? That’s specialization talking. A regular hammer is symmetrical; a specialized masonry hammer with its strange angles is not.
Complexity level: I’ve learned that the number of moving parts or adjustment mechanisms is a huge clue. A simple chisel has zero moving parts—it’s basically sharp steel on a stick. But a Stanley #45 combination plane? That thing has multiple fences, depth stops, and interchangeable cutters. That level of complexity screams “specialized tool for advanced work.”
The detective’s secret: Wear patterns: This is where it gets really interesting. Where’s the tool shiny from use? Where’s it worn down? These aren’t just signs of age—they’re a roadmap of how the tool was actually used. A saw handle worn smooth on one side? Someone favored that grip for years. Deep wear marks on a specific part of a blade? That tells you exactly what kind of cutting it did.
Quick Hack: Take photos from multiple angles before you start cleaning. Sometimes wear patterns and subtle features disappear after cleaning, and you’ll want that reference.
Material Composition
The materials of a tool are like a birth certificate, if you know how to read them. The story often starts with the metal itself. Early wrought iron, for example, is a dead giveaway with its distinctive, almost fibrous grain and lack of perfect uniformity. It’s a world away from cast iron, which typically appears darker and may still carry the faint lines from the mold it was poured into. Even the patina on steel can be a guide; a high-carbon tool ages with a completely different pattern and color than its mild steel counterpart.
But don’t just look at the metal—the handle is just as telling. The specific types of wood used and the very style of how they were turned on a lathe evolved constantly. Seeing rosewood, boxwood, or beech can point to different purposes and periods. And, of course, the moment you spot a plastic handle, your detective work is mostly done; that’s a clear sign of a twentieth-century piece, or newer.
It’s not all about iron and wood, either. When you find a tool that incorporates brass or bronze, pay close attention. These non-ferrous metals were often reserved for precision instruments and high-quality implements, suggesting a superior level of construction and pointing to a potentially valuable piece.
Finally, look at the tool’s “skin.” The surface treatment is a crucial time stamp. That deep, crackled black varnish you often see is called “Japanning,” and it signals a very different manufacturing era than later nickel plating or the bright, hard shine of chrome. Each of these finishes tells a story not just of when a tool was made, but the level of quality its maker was aiming for.
Here’s where things get precise, and this is a tip that’s saved me from expensive mistakes more times than I can count: eyeballing measurements isn’t enough when you’re dealing with valuable or rare tools.
Let me give you a real example. I once thought I had a rare Stanley No. 1 plane—the smallest and most valuable of the Bailey line. The size looked right, the weight felt right. But when I measured the sole length with precision, it was 5.75 inches instead of the 5.5 inches it should have been. Turned out to be a cut-down No. 2. The difference? About $3,500 in value. Ouch.
This is where eyeballing fails you completely. Is that handle ferrule truly 1.0” or is it 1.125”? Does the blade stock match the exact 0.093” thickness specified in an old patent filing? These tiny differences can be the dividing line between “common user tool” and “rare collector’s piece.”
The Tool I Use to Identify Tools: Honestly, the most crucial piece of equipment in my identification kit is a quality digital caliper. When you can instantly measure internal dimensions, external dimensions, or depth down to the thousandth of an inch on a clear LCD display, you transform from guessing to knowing. It’s the single best investment for serious tool identification—think of it as a detective’s magnifying glass for the 21st century.
Pro Hack: Create a measurement journal. When you positively identify a tool, record its key dimensions. Over time, you’ll build your own reference database that’s invaluable when evaluating similar items.
Functional Components
Beyond the materials, you have to look at the tool’s job. The specific angle of a cutting edge, the pattern of its teeth, or the precise bevel aren’t just design choices—they’re a resumé of its intended purpose. The same goes for any adjustment mechanisms; a simple wedge tells a different story than a complex lever or screw. Even the way a handle is shaped reveals how it was meant to be held, while built-in rulers or depth stops are a clear sign that precision was the name of the game.
Decoding Maker’s Marks and Patents
Of course, the most direct path to an ID is the “signature”—the maker’s mark. But reading these marks is an art form, especially since the practices changed so dramatically over time.
Evolution of Marking Practices
In the beginning (pre-1800), you’re lucky to find a simple craftsman’s initial. As the 19th century progressed, these evolved from basic company names to the elaborate, sometimes ornate logos of the late 1800s, often bragging about quality with phrases like “Cast Steel” or “Warranted Superior.” By the 20th century, things became standardized with patent numbers (replacing simple dates) and the now-familiar “Country of Origin” stamp.
Types of Marks
These marks were applied in different ways—stamped into the metal, cast as partl of the tool itself, or delicately etched onto high-quality surfaces. Sometimes, you’ll just find the ghostly outline of a paper label on a wooden handle, a fragile clue that rarely survives.
The frustrating part? These stamps are often tiny, shallow, worn by time, and filled with a century of grime. This is where the real detective work begins. You simply can’t identify what you can’t see, which is why a good jeweler’s loupe set with built-in illumination isn’t just a ‘nice to have.’ It’s arguably the most critical tool for this part of the process. Being able to get 30x or 60x magnification on a tiny, dark stamp is often the only way to find that one crucial letter or number.
Patent Date Interpretation
One final, crucial tip: a patent date is not a manufacturing date.
It only tells you the earliest possible date the tool could have been made. A tool marked “PAT. JAN. 14, 1902” could have been (and often was) produced well into the 1920s or 30s. And if you see “PAT. PEND.,” you’ve found a neat little snapshot: a tool that was manufactured after the company applied for the patent but before it was officially approved.
It’s the single most frustrating moment for any tool collector: you find a promising piece, but the maker’s mark is just an illegible smudge. You squint, you angle it under a bright lamp, but the details are simply lost to a century of wear and grime. You can’t identify what you can’t see
Determining Age: Dating Your Mystery Tool
No single clue tells the whole story. The most reliable age estimates come from combining several dating methods.
Manufacturing Technique Analysis
Look at how it was made. Was it hand-forged before 1850, showing hammer marks and asymmetry? Or does it have the early machine production (1850-1900) look, with uniform milling marks and some hand-finishing? This evolved into mature industrial (1900-1950) consistency, and finally modern manufacturing (1950+) with its composites and precision casting.
Material Timeline
Materials are a clear timeline. Wrought iron with its distinct grain is almost always pre-1900. Handles tell a similar story, evolving from native hardwoods to exotic woods (post-1850), then to early plastics and fiberglass (1920s-1960s), and finally to modern composites.
Patent Research
If you find a patent date or number, you’ve struck gold. This is a definitive clue. Your best free resources are Google Patents and the official USPTO database. Just search the number and review the original drawings. But remember the key rule: the patent date is only the earliest possible manufacturing date, not the actual date.
Common Vintage Tool Categories
You’ll quickly start to recognize the common players. Knowing these categories accelerates any identification.
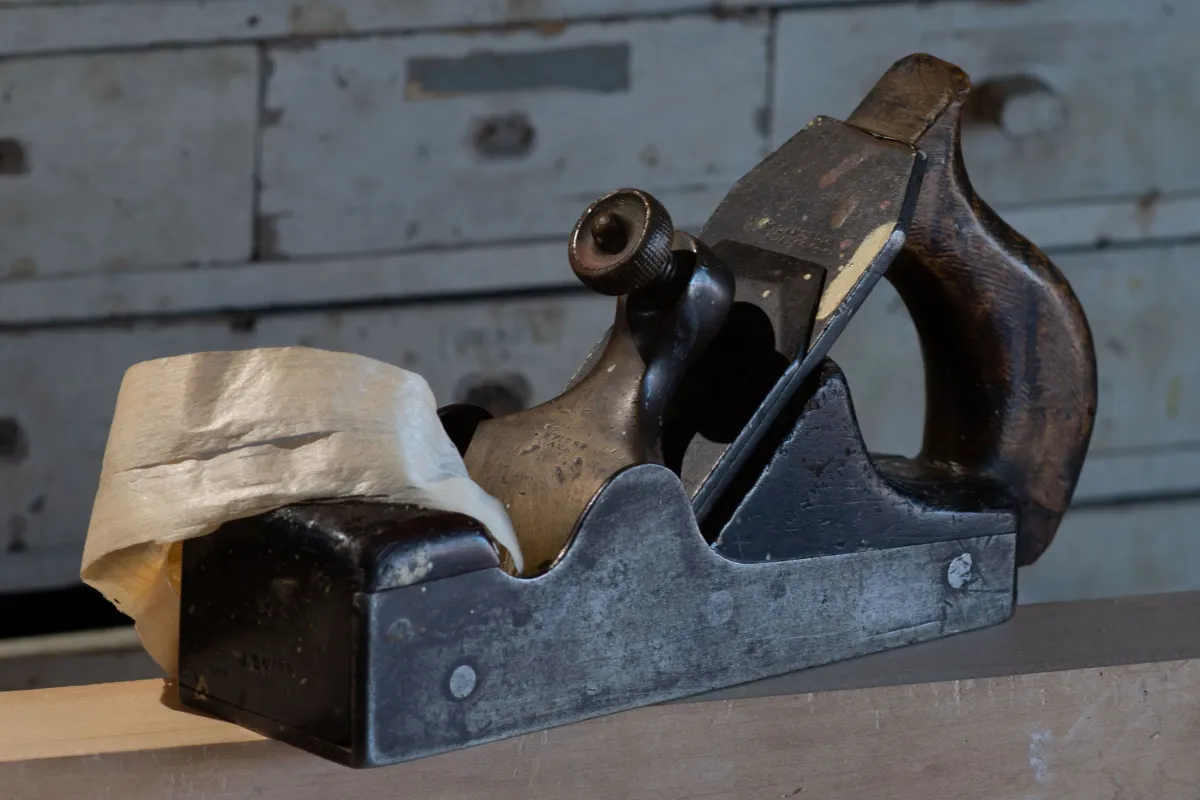
Woodworking Planes
Planes are one of the most collected categories. The key is to first identify its job: Is it a bench plane (like a No. 4 smoother or No. 7 jointer) for flat surfaces? A small block plane for end grain? Or a specialty plane for cutting grooves or molding? Look for maker’s marks on the toe or lateral lever, and use the length and adjustment mechanism to pin down its era.
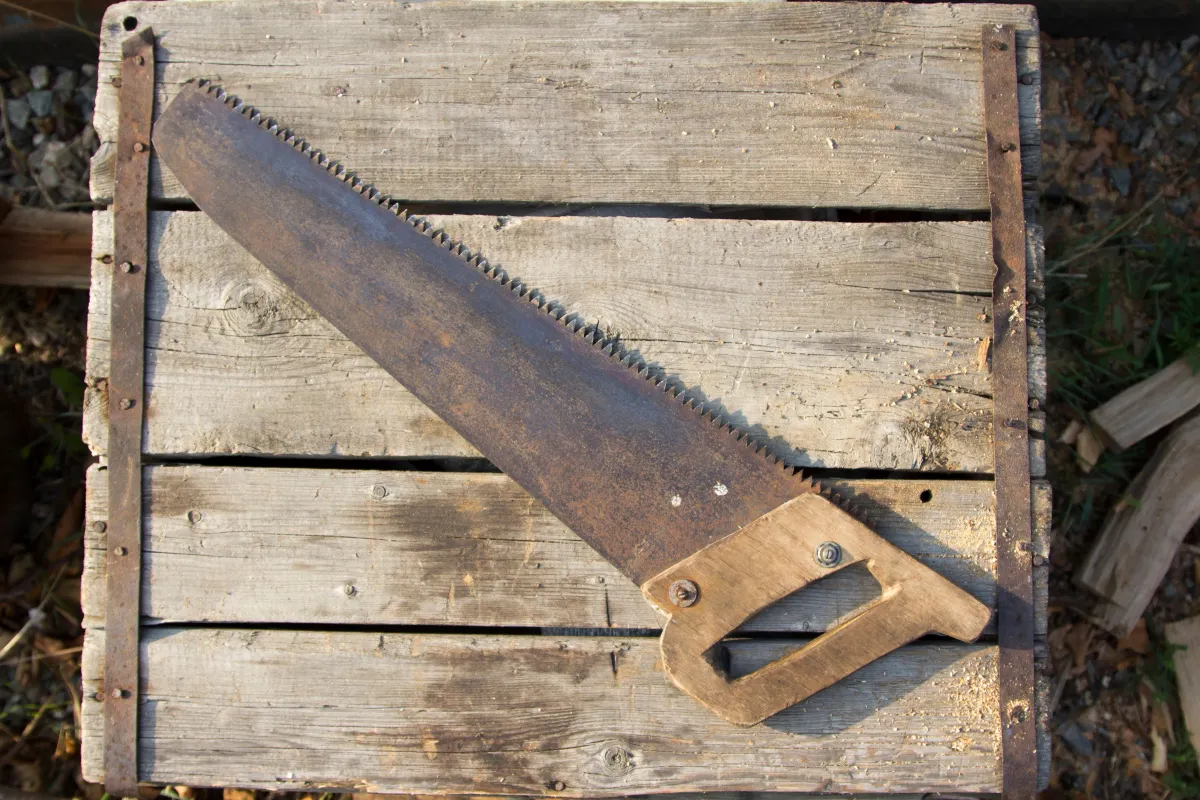
Hand Saws
For saws, it’s all about the teeth and the handle. Rip teeth are aggressive for cutting with the grain, while crosscut teeth are like knives for cutting across it. The handle style—especially the “pistol grip” (common after 1850) and the quality of the wood (like apple or rosewood)—is a huge clue to its quality and age.
Measuring and Layout Tools
This category includes all the precision tools: try squares, dividers, levels, and marking gauges. Identification here relies on material quality and the style of the graduations.
When to Seek Professional Help
You’re never truly alone in this hobby. When you’ve hit a dead end, there is a massive community of experts, both amateur and professional, ready to help.
For a quick identification or a casual question, the online communities are fantastic. Subreddits like r/tools and r/handtools, along with dedicated woodworking forums like SawmillCreek or Lumberjocks, are filled with knowledgeable people.
If your tool seems particularly valuable and you need a formal valuation for insurance or sale, you’ll want a professional appraiser who specializes in tools. You can also get excellent information from auction house specialists and even museum curators.
Finally, for the deepest knowledge, consider joining one of the official tool collector organizations. Groups like the Mid-West Tool Collectors Association (MWTCA), the Early American Industries Association (EAIA), and the UK-based Tool and Trades History Society (TATHS) are the definitive authorities.
Frequently Asked Questions
Q: How can I identify a tool with no markings?
A: Unmarked tools require identification through form, function, and materials. Determine the tool’s basic category based on primary features. Compare dimensions to documented examples. Post clear photos in tool identification forums where experienced collectors can recognize patterns.
Q: Are all old tools valuable?
A: No. Age alone doesn’t determine value. Common tools manufactured in large quantities have modest value. Factors increasing value include renowned makers, rare specialized types, exceptional condition, complete sets, and documented provenance.
Q: How do I determine if a rusty tool is worth restoring?
A: Assess rust depth and the tool’s underlying value. Surface rust responds well to treatment. Deep pitting compromises function. Consider the tool’s rarity—common tools may not justify extensive restoration. Remember that over-restoration can reduce collector value.
Q: What’s the difference between patent dates and manufacturing dates?
A: Patent dates indicate when a design was patented, not when your tool was made. A tool marked “PAT. 1902” could have been manufactured anytime from 1902 to decades later. Research how long companies produced specific models to narrow the manufacturing date.
Q: Should I clean tools before trying to identify them?
A: Limited gentle cleaning helps reveal marks without damage. Remove loose dirt with soft brushing. Avoid aggressive cleaning or rust removal before identification—original patina provides dating clues. Once identified, make informed restoration decisions.
Q: Can I use vintage tools or should I preserve them?
A: This depends on rarity and condition. Common vintage tools in good working condition make excellent users—they were built to last. Rare or collectible tools deserve preservation. Research value before putting uncertain tools to work.
Conclusion: Becoming a Confident Tool Identifier
Here’s what I’ve learned after years of tool identification: it’s never just about putting a name to an object. Every time you correctly identify a tool, you’re doing something much more meaningful—you’re preserving a piece of craftsmanship history, honoring the skill of people who worked with their hands, and keeping knowledge alive that might otherwise disappear.
I still get stumped sometimes. We all do. The tool universe is absolutely massive—centuries of innovation, countless regional variations, and trades that have long since vanished. When you hit a wall with a particularly mysterious piece, don’t get discouraged. It just means you’ve found something genuinely rare or unusual, which is actually pretty exciting.
Your Action Plan: Start applying what you’ve learned today:
This Week: Pick one mysterious tool and practice the visual examination techniques we covered. Take detailed photos, measure key dimensions, and look for any marks (even partial ones).
This Month: Join at least one online tool community. Post your mystery tools with good photos and watch the collective knowledge at work. You’ll be amazed at how helpful people are.
This Year: Build your reference library. Start with a couple of good books on your area of interest, bookmark useful websites, and most importantly—handle as many tools as you can. Visit estate sales, antique shops, and tool swap meets. There’s no substitute for physical examination.
The Real Treasure: The skills you develop go way beyond just identifying tools. You’ll find yourself noticing craftsmanship everywhere, understanding how things were made before modern manufacturing, appreciating the ingenious solutions people developed for everyday problems, and connecting with a passionate community of people who value quality and history.
Remember, every expert was once a beginner holding their first mystery tool and wondering where to start. The difference between them and everyone else? They started asking questions and didn’t stop. You’re already on that path.
Now get out there and start solving some tool mysteries. That strange implement in your grandfather’s workshop isn’t going to identify itself—and honestly, the journey of figuring it out is half the fun.